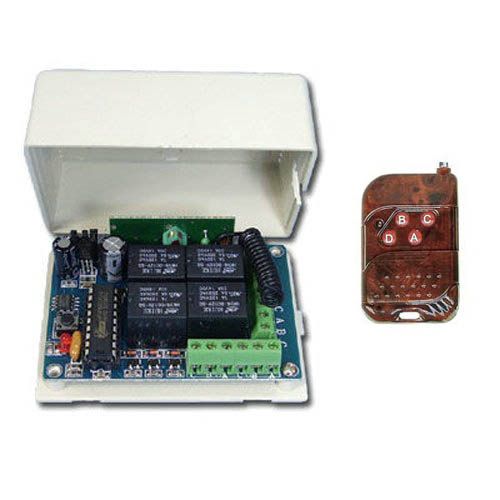
The module has four relays (7 amps max per) on screw down terminal blocks. PicoBoos, BooBoxs, lights, or any other device that can be triggered from a relay can now be activated wirelessly. Use with all FrightProps controllers and audio players or your own devices with trigger input. Package Includes:
- 1 x Control Switch Board with four 7-amp relays on it
- 1 x Remote Control with four buttons
Requires a 12VDC Power Supply. If you are powering from another device (such as a PicoBoo) then you will not require one.
Features:
• Working Voltage: DC12V
• Output voltage: Decided By the COM PIN INPUT
• Loop current limit:5A
• Idle Current: 5mA
• Working Frequency: 433Mhz
• Receiving Sensitivity: -104dBm
• Function option: Momentary/Toggle/Latched
Pin functions:
+V: Positive pole input
GND: Negative pole input
1 - Normal Closed of Relay 1
2 - KC1 Common of Relay 1
3 - KC1 Normal Open of Relay 1
4 - KC3 Normal Closed of Relay 2
5 - KC3 Common of Relay 2
6 - KC3 Normal Open of Relay 2
7 - KC2 Normal Closed of Relay 3
8 - KC2 Common of Relay 3
9 - KC2 Normal Open of Relay 3
10 - KC4 Normal Closed of Relay 4
11 - KC4 Common of Relay 4
12 - KC4 Normal Open of Relay 4
Please Note:
-
-
- Actual antenna range will vary greatly depending on the installation and operating environment
Programming:
When you receive the product, it maybe set in one remote mode randomly, that is because each unit is tested at the factory.So, if you want to select the remote mode you like, please delete the existing data as described below:
Press the learning key on the Receiver Switch Module board 8 times, then wait for the LED indicator on the board flash 7 times, this will reset the mode of the remote.
How to set the remote mode:
1 - Momentary:
Press the learning key on the Receiver Switch Module board once. The on-board LED indicator will flash. Then press any key on the remote, the on-board LED indicator will flash 3 times to inform that momentary mode was set successfuly.
2 - Toggle:
Press the learning key on the Receiver Switch Module board 2 times. The on-board LED indicator will flash.Then press any key on the remote, the on-board LED indicator will flash 3 times to inform that toggle mode was set successfuly.
3 - Latched:
Press the learning key on the Receiver Switch Module board 3 times. The onboard LED indicator will flash.
Then press any remote key (i.e.: A) followed by a second key (i.e.: B), the on-board LED indicator will flash 3 times to inform that latched mode was set successfuly. The first pressed key will be ON and the second pressed key will be OFF.
4 - Relays 1 and 2 Momentary / Relays 3 and 4 Toggle:
Press the learning key on the Receiver Switch Module board 4 times. The onboard Led indicator will flash.
Then press any key on the remote, the on-board LED indicator will flash 3 times to inform that this mode was set successfuly.
5 - Relays 1 and 2 Momentary / Relays 3 and 4 Latched:
Press the learning key on the Receiver Switch Module board 5 times. The onboard Led indicator will flash.
Then press any key on the remote, the on-board LED indicator will flash 3 times to inform that this mode was set successfuly.
6 - Relays 1 and 2 Toggle / Relays 3 and 4 Latched
Press the learning key on the Receiver Switch Module board 6 times. The onboard Led indicator will flash.
Then press any key on the remote, the on-board LED indicator will flash 3 times to inform that this mode was set successfuly.
7 - Relays 1 and 2 Latched / Relays 3 and 4 Latched:
Press the learning key on the Receiver Switch Module board 7 times. The onboard Led indicator will flash.
Then press any key on the remote, the on-board LED indicator will flash 3 times to inform that this mode was set successfuly.