Programming:
The remote must be trained to the base unit for these to function. Several modes of operation are available. To train the remote, first make sure the remote has a battery in it (remotes are sometimes shipped without batteries). With power to the unit follow these steps to train the base station to the remote:
For Momentary Mode:
- Press the white button on the base station one time. The red LED on the circuit board should blink and then turn off.
- On the remote, press the A Button once and the B button Once.
- The LED should turn back on. Pressing the A button should now turn on Relay 1 momentarily (i.e.: for as long as you hold down the button on the remote). Pressing B should turn on Relay 2.
For Latching Mode:
- Press the white button on the base station two times. The red LED on the circuit board should blink and then turn off.
- On the remote, press the A Button once and the B button Once.
- The LED should turn back on. Pressing the A button should now turn on Relay 1, pressing it again will turn Relay 1 off. Pressing B should turn on Relay 2, pressing it again will turn off Relay 2.
For Flip Flop:
- Press the white button on the base station three times. The red LED on the circuit board should blink and then turn off.
- On the remote, press the A Button once and the B button Once.
- The LED should turn back on. Pressing the A button should now turn Relay 1 on and Relay 2 off. Pressing B should turn Relay 2 on and Relay 1 off.
One Relay Momentary, the Other Latching:
- Press the white button on the base station four times. The red LED on the circuit board should blink and then turn off.
- On the remote, press the A Button once and the B button Once. For this mode, whichever button you press first will be momentary, and the other will be set to latching.
- The LED should turn back on. If A was pressed first, A should now turn on Relay 1 in momentary mode. Pressing B should turn on Relay 2 in latching (pressing B again will turn Relay 2 off). If B was pressed first this will be reversed, with A being Latching and B being momentary
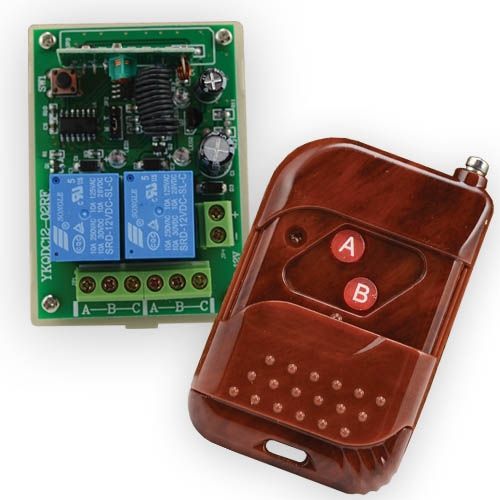
The module has two relays (7 amps max per) on screw down terminal blocks. PicoBoos, BooBoxs, lights, or any other device that can be triggered from a relay can now be activated wirelessly. Use with all FrightProps controllers and audio players or your own devices with trigger input.
Package Includes:
- 1 x Control Switch Board with two 7-amp relays on it
- 1 x Remote Control with two buttons (red is relay 1, gray is relay 2)
Requires a 12VDC Power Supply. If you are powering from another device (such as a PicoBoo) then you will not require one.
Specifications:
Control Switch Board:
- Operating Voltage: DC 12V
- Max. Load: 7A Per Relay
- Working Frequency: 315MHz / 433MHz
- Encoding Type: Fixed Code
- Output Mode: Two switch signal
- Size: 50 x 70 x 18mm / 1.97 x 2.76 x 0.71 in
Remote Control:
- Working Voltage: DC 12V (23A/12V battery)
- Working Current: 10mA
- Power: 10mW
- Transmission Frequency: 315MHz / 433MHz
- Oscillation Resistance: 4.7MΩ / 3.3MΩ
- Transmission Distance: 650ft / 200m
- Encoding Type: Fixed code
Please Note:
- Actual antenna range will vary greatly depending on the installation and operating environment
- All units use the same frequency and there is not a way to change that. What this means is that two units cannot be used in the same location and be triggered separately