
How to make a vertical lifter rig
Please note: This project was submitted by FrightProps customer Darin Cleveland. It has not been verified by FrightProps and we cannot provide support on this project.


Description:
This instructional will show you how to build an air driven rig that will raise and lower a prop about three feet. Optionally, it can lurch forward.
Required Tools:
- Tape measure
- Welder
- Metal saw (electric powered or hand saw. Electric is strongly advised)
- Metal grinder
- Drill (a drill press is recommended for straight holes)
Required Parts:
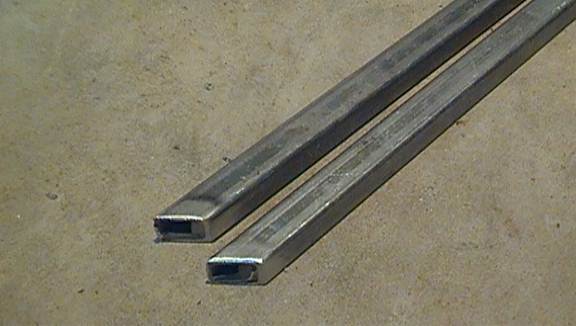
- Fourteen feet of ½ inch square steel tubing (also can be found in almost any hardware store)
- Two, 2inch long bolts of 1/4th inch diameter. (any sized bolt will work so long as it fits within the 1/2inch steel tubing but the thicker the bolt is, the more stable it will be. This is just the bolt used in this specific example. Apply this note for all nuts and bolts mentioned in this instructional)
- Two 3/2inch long bolts of same diameter.
- four lock nuts of the same diameter
- six washers to fit the bolts
- a power cord or trigger to power the cylinder solenoid
- an air compressor
FrightProps required parts:
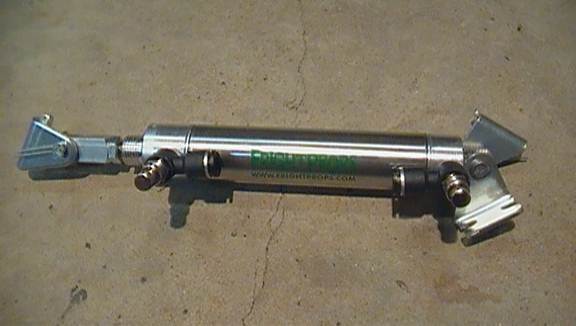
- An air cylinder (cylinder used in instructional is a 4inch stroke 1 1/16 bore double-acting universal mount FrightProps cylinder.
- A FrightProps Single-Acting Cylinder hook-up starter kit (1/4inch tubing, 12VDC or 110VAC, depends on your power source.
- A rod clevis (5/16-24 (F))
- 3 Clevis mounting brackets (.25in hole, .11in thickness)
- A quick connect with push on (to connect the system to your air compressor)
- 2 Male connector push-ons with flow control, 1/8 Threads 1/4 Tubing
Optional Parts:
*Total cost: approximately $150
*not counting the air compressor, air regulator, wood base board, or prop you wish to attach to the rig.
Important Notes:
- Please read through all steps before starting this project.
- Remember that pneumatics can extort a lot of force and can be dangerous. Maintain a safe distance and keep your pneumatic rig away from objects and other people while it is powered on. When testing this prop for the first time, twist the flow control connectors almost all the way clockwise to test it at its slowest speed.
- Practice safety when modifying power cords. NEVER modify a power chord when it’s plugged in.
Step 1:
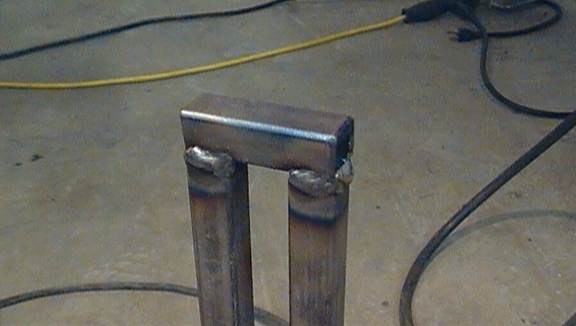
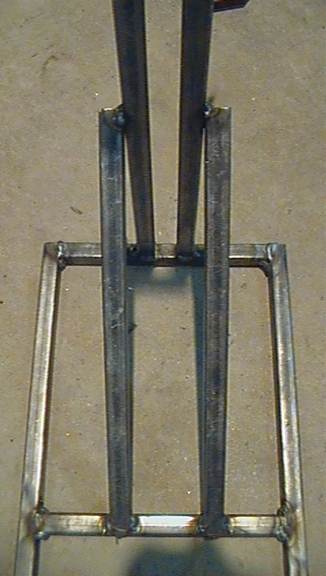
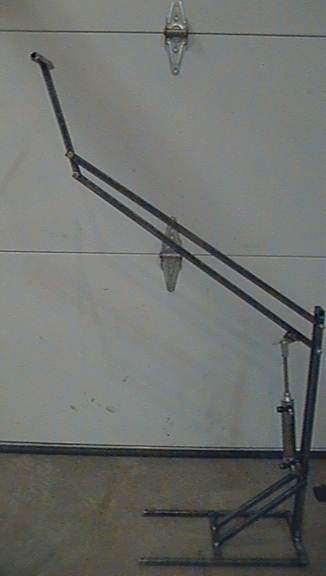
Cut two 14inch segments out of your 1/2inch steel tubing, and two 6inch segments. Take the two 14inch segments and one 6inch segment and weld them into a U-shape as seen bellow.
When you’re done, go ahead and drill holes in each of the corners of the U. You’ll use these holes to later mount your rig onto a base platform.
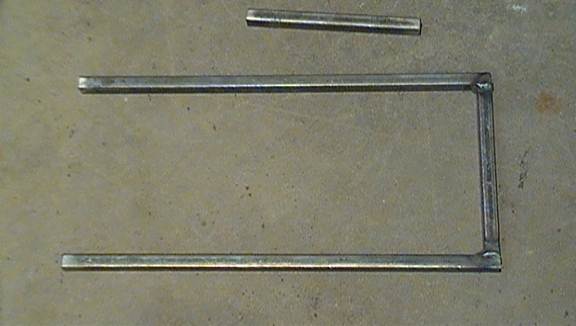
Builder’s tip: keep the second piece of 6inch segment between the open ends of the U to guide you and keep the 14inch pieces parallel to each other. 90degree magnets are also very helpful.
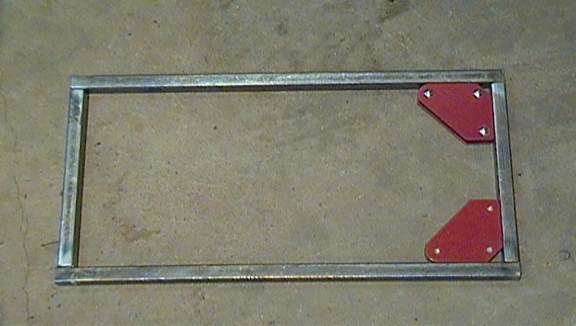
Step 2:
Cut two 20inch long pieces of 1/2inch steel tubing. Weld them in the center of the U’s “bottom” edge with a gap between the two pieces large enough to fit a third piece of 1/2inch steel tubing and two washers between them.
Once these pieces are welded on, double check that a 1/2inch piece and two washers will still fit between the pieces (make sure that it’s loose enough for the washers to spin in them, the rig arm will go here). When you have, weld a 3/2inch piece of 1/2inch steel over the top of the pieces, to brace them against each other.
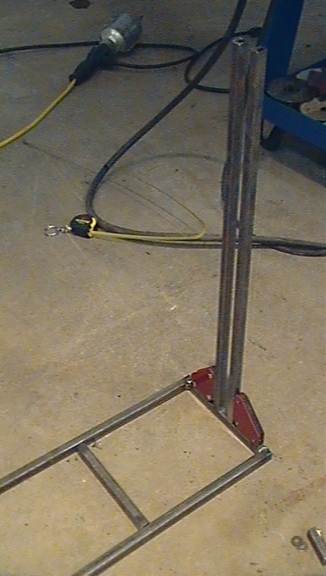
Step 3:
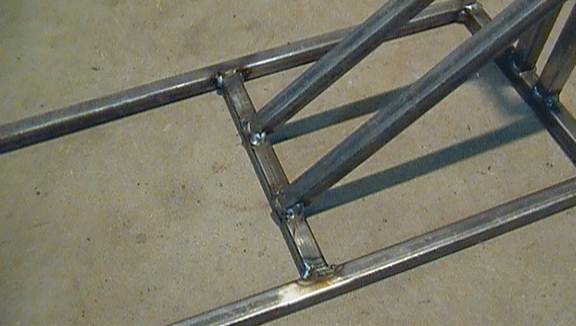
Weld the remaining 6inch piece in about the middle of the U.
Cut two pieces about 10inches long from stock of 1/2tubing. Cut the tips off of them so that the ends have a 45degree angle. Afterwards, weld these pieces from the top of the crossbar in the U-piece (45degree edge down) to the outer sides of the two vertically pointing rods.
These pieces are for stability.
Step 4:
While you’re still at the welder, cut a 6inch and a 8inch (measurements don’t need to be exact) and weld them into a T-shape. This is what you’ll attach your prop to later on, and the shape offers many ways to do so.
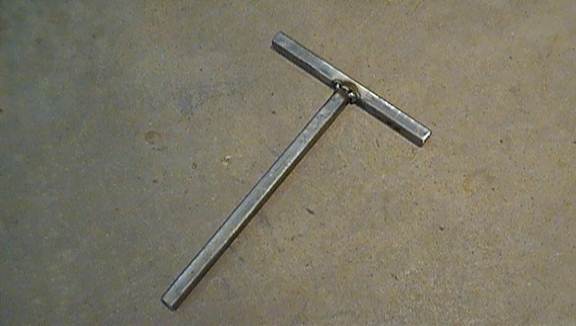
Go ahead and drill a few holes in the “head” of the T, and one or two in the middle of the shaft. This is where you will attach your prop to the rig.
Step 5:
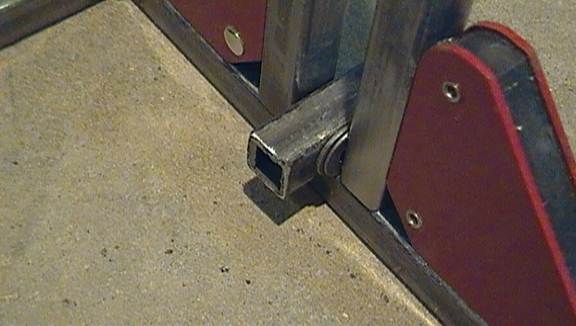
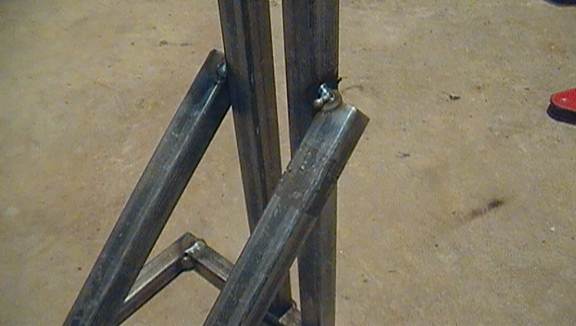
Drill holes (equal diameter of the bolt you intend to use) straight through the vertical rods, about one inch down from the crossbar. It’s important that these holes line up so that the rig arm moves straight. It is recommended to use a drill press and drill through both rods in one go.
Step 6:
Cut two 2ft pieces of 1/2inch steel rod. These will be used as the arms. On each end of both arms, drill a hole straight through of equal diameter to the bolts you have.
Mount the arm in the rig with the bolt, spacing it in the center of the two rods with the two washers. Use a lock nut to keep the bolt secured. The arm should rotate freely.
Step7:
You’ve already drilled holes through the far end of your arm pieces. Now you need to drill holes through the T-shaped piece in order to mount it on the rig. There are two ways you can do this.
Without lunge:
If you want your prop to simply move up and down without roatating, drill holes in the T-piece an equal distance apart as the distance between the two bolts holding the arms to the mast of your rig. Attach the T-piece with your 3/2inch bolts, washers, and lock nuts. Keep it loose enough that it rotates freely. When you move the rig, the arms should stay parallel to each other, and as a result the T-piece will be kept perfectly vertical no mater how the arm rotates.
(picture not shown)
With lunge:
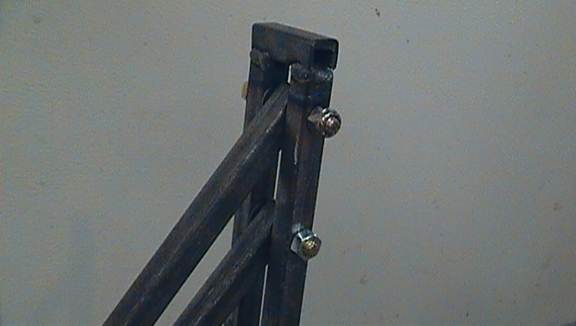
When the arm is in a lowered position, hold the T-piece against the arms so that both holes on the arms’ ends line up with the shaft of the T. Mark their locations and drill holes through the T-piece. Attach the T-piece with your 3/2inch bolts, washers, and lock nuts. Keep it loose enough that it rotates freely. When the arms are lowered, the T-piece should be angled back. When the arms are raised, the T-piece should angle forwards. When in motion, this gives whatever prop is attached to it a lunging effect.

Step 6:
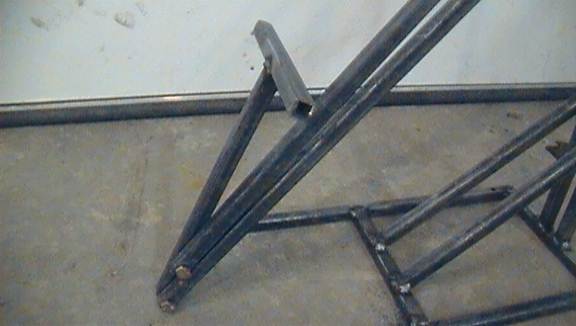
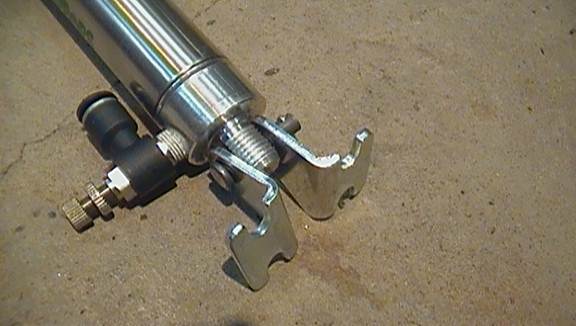
Set up your pneumatic. Attach a rod clevis to the “nose” (the cylinder’s shaft end) and a clevis mounting bracket to that. Attach the two remaining clevis mounting brackets to the “base” (the other end).
Also install two male-connector push-ons with flow control. You’ll need two in order to regulate how fast the cylinder extends and retracts.
Step 7:
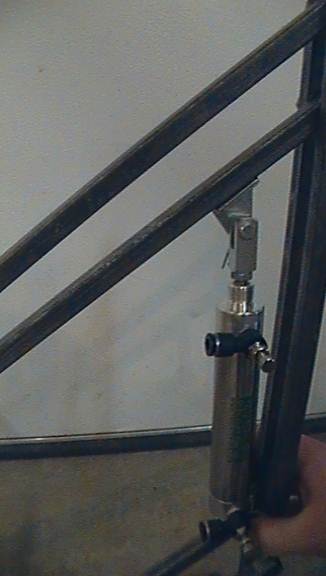
Now it’s time to attach the pneumatic. You want to attach the base brackets to the vertical shafts of the rig and the clevis bracket to the underside of the rig arm (keeping in mind that if it’s a ground mounted rig, you don’t want the arm to ever drop bellow ground level) so that when the pneumatic’s rod is retracted, the arm is lowered, and when the rod is extended, the arm is lifted.
There is a lot of guess and check work here. Use clamps or just your fingers to move the base brackets and the clevis bracket to different positions and examine how the arm is rotated with the pneumatic rod retracted and extended.
Before committing to any permanent welds, when you think you have the right positions, tack weld them in place. Double and triple check that the arm moves to the locations you want it to when extended and retracted.
When you’re confident that you have the right spots, weld firmly in place.

Step 8:
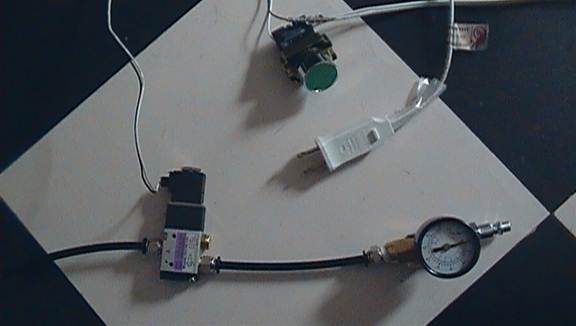
Supply power to your pneumatic. Use your single-acting solenoid (you only need single-acting because gravity will retract your rig for you) and follow the proper instillation/setup instructions found on FrightProps.com. You’ll want to hook the “output” hose of your solenoid to the base male connector on your cylinder, as it will need power to extend and lift and it will rely on gravity to retract and lower it.
To activate the solenoid, and as a result your pneumatic rig, you need to supply it power. If you bought a 110VAC activated solenoid, you just need to splice a power chord and solder or crimp the wires together. Plugging the cord in will turn the solenoid on and the cylinder will extend. Unplugging it will turn the solenoid off and the cylinder will retract.
Power adapters/transformers will be needed for a 12VDC or 24VDC solenoid. These can be found at FrightProps.com as well.
Naturally, this isn’t very practical, but it’s good for testing. You can install a button (such as shown bellow), a pressure mat, a motion sensor, or other triggers to activate your pneumatic rig.
Use the push-on connector at the other end of your airline hose. Hook a regulator to that, and an air-compressor hose adaptor to that. Plug it into your air compressor and you now have power to your pneumatic.
It is HIGHLY RECOMMENDED that you use an air regulator here. FrightProps systems are not designed to operate above 120 psi, and pneumatics can be very dangerous when supplied large amounts of pressure.
Step 9:
This is not a stand-alone rig. The arm makes it unbalanced. Use the holes in the base of your rig to attach it to a base platform, such as a wide platform of wood. Chip-wood and plywood work just fine. Make sure that the platform is large, heavy, and stable enough to keep the rig firmly in place when it moves its arm repeatedly.
(picture not shown)
Similarly, use wood to mount your prop to the T-piece. It is recommended to mount a prop to a two-by-four piece of wood, and then affix the piece of wood to the T-piece with screws. This way, you won’t have to alter the rig itself to swap between props. If you can attach a prop to a piece of wood, you can use it with this rig.
(not shown)
Haunted House ideas:
- Universal use: attach any prop to the rig that a person would expect to be a static (nonmoving) prop, such as a skeleton. Use this rig anywhere you wouldn’t or couldn’t use a live actor.
- Barrel popper: Build this rig with an arm short enough to be placed inside and function within a garbage can or barrel. Use the without-lunge build. Your prop will leap out of a barrel for a common but ever popular scare.
- Grave buster: if using this rig for an outdoors attraction, dig a hole large enough to fit this rig and place a concealed trap-door over it. Haunted house patrons expect things to pop out at them from behind trees and gravestones, but rarely from the ground itself.
FINAL NOTES:
Remember that pneumatics can be dangerous if the right precautions are not taken.
- Make absolutely sure that the rig is receiving less than 120PSI at all times.
- When testing the rig for the first time, make sure all persons are at least five feet away and to the side of the rig (not behind or in-front), and that the area is clear around the rig.
- Make sure that the prop and the base platform are securely attached to the rig before activating it.
- Be sure to regulate pressure or enlarge the base platform so that the rig does not move from its spot when activated repeatedly.
- Inform everyone working around or with the rig about the dangers of it, and safe operation.
- When using this rig for an attraction, be sure that it is placed where it has no chance of physically striking someone, even if they wander from the attraction’s designated path. It is safer yet to regulate PSI to the minimal force required to lift your prop.
