
How to Make a Simple Prop Flipper
Please note: This project was submitted by FrightProps customer Darin Cleveland. It has not been verified by FrightProps and we cannot provide support on this project.
Description:
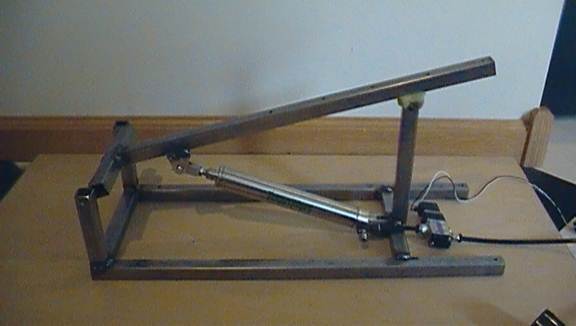
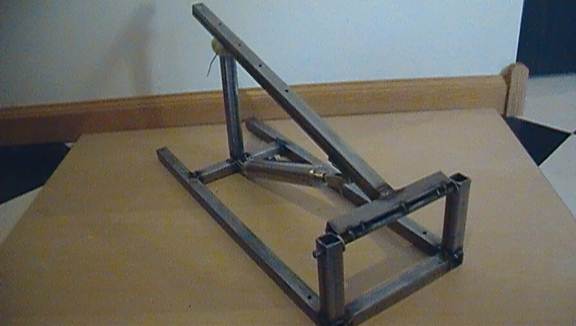
This instructional shows you how to build an air driven flipper rig that will quickly flip a prop approximately 80 degrees. An easy project and a good introduction to pneumatic rigs. (you should have some experience with welding, but great skill is not required)
Required Tools:
-Tape measure
-Welder
-Metal saw (electric powered or hand saw. Electric is strongly advised)
-Metal grinder
-Drill (a drill press is recommended for straight holes)
Required Parts:
-8 feet of 3/4inch square steel tubing
-at least 1 foot of cylindrical metal rod (size may vary, but ¼inch diameter or larger is recommended)
-two washers with the same hole diameter as the rod
-a power cord or trigger to power the cylinder solenoid
-an air compressor
FrightProps required parts:
-an air cylinder (cylinder used in instructional is a 4inch stroke 1 1/16 bore single-acting non-rotating universal mount FrightProps cylinder (/pneumatics/cylinders/least-common/single-acting/stainless-steel-body-single-acting-non-rotating-universal-mount-cylinders/1-1-16-bore-single-acting-non-rotating-universal-mount-cylinder-0914-1062.html ). This bore of cylinder exerts more power than necessarily needed, so cylinders of smaller bore may be alternatively used.)
-A FrightProps cylinder hook-up starter kit (single acting, 1/4inch tubing, 110VAC. /pneumatics/kits/pneumatic-hook-up-kits/cylinder-hook-up-starter-kit-single-and-reverse-acting-0595-0028.html )
-a Pivot Bracket (if using the cylinder above, use a .25in hole x .38in opening /pivot-bracket-one-piece-with-pin-0776-0380.html )
-a rod clevis (if using the same cylinder, 5/16 – 24 /rod-clevis-0582-0021.html )
-a clevis mounting bracket(if using the same cylinder, .25in hole, .11in thickness /clevis-mounting-bracket-0582-0131.html )
-quick connect with push on, ¼ tube size (to connect the system to your air compressor. /quick-connect-with-push-on-0734-0213.html )
Optional Parts:
-a piece of rag or foam (for the stop)
-air regulator /pneumatics/regulators-line-filters/regulators.html
-male connector push-on with flow control, 1/4in tube /male-connector-push-on-with-flow-control-0736-0017.html
-any trigger, from motion sensor, step mat, or button activated.
*Total cost: approximately $150
*not counting the air compressor, air regulator, wood base board, or prop you wish to attach to the rig.
Important Notes:
-Please read through all steps before starting this project.
-Remember that pneumatics can extort a lot of force and can be dangerous. Maintain a safe distance and keep your pneumatic rig away from objects and other people while it is powered on.
-Practice safety when modifying power cords. NEVER modify a power chord when it’s plugged in.
Step 1:
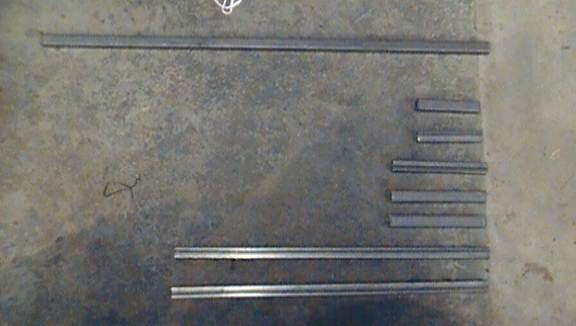
Cut your 3/4inch pipe into two 18inch pieces, three 6inch pieces, and two 4inch pieces. You will have a longer piece of metal left over.
Also cut an 8inch piece from your metal rod (not shown)
Step 2:
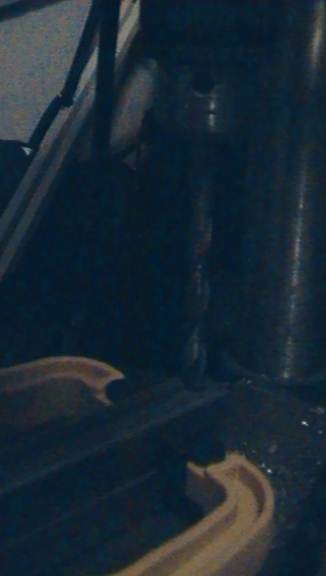
Take the two 4inch pieces of metal and drill holes through them near the end (through both sides). Use a drill bit of equal diameter to the metal rod you will be using. Be sure that the holes you drill are perfectly perpendicular to the length of the square tube, so that the hole of one 4inch tube will line up with the hole of the other 4inch tube.
This is where a drill press comes in handy. Instead of drilling each tube separately, line the tubes up and clamp them together. Drill the holes through both tubes at the same time. This will assure that the holes will line up with each other later.
Step 3:
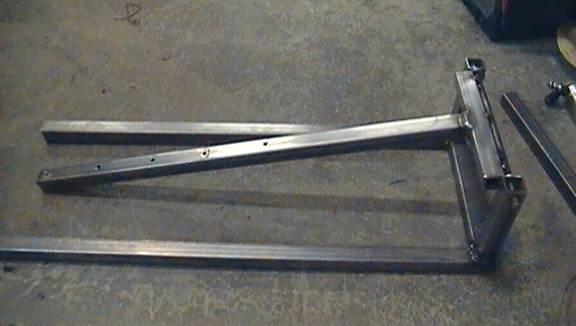
Take one of the 6inch pieces and the two 18inch pieces and weld them into a U shape. Try to make the corners as close to perfect ninety degrees as possible, and keep the two 18inch tubes parallel to each other.
TIP1: use magnets with ninety degree edges to hold the metal in place while you weld.
TIP2: use another piece of 6inch tubing and place it on the open end of the U to help you keep the two 18inch tubes parallel.
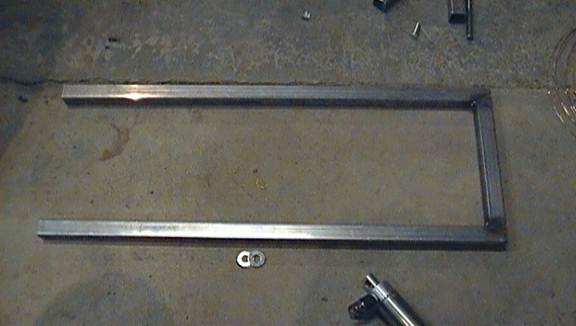
When you’ve completed this, feel free to drill a few holes in it. You’ll be mounting this to a base of wood later. Just don’t place holes too close to the bottom corners of the U.
Step 3:
You have two pieces of 6inch tubing left. Use a metal grinder to shorten one of the 6inch tubes to where the tube length plus the thickness of the two washers is equal to 6inches.
Step4:
Take your 8inch piece of rod and weld it to one side of your less-than-6inch-tube. Try to be as parallel and centered as possible. Welding a cylindrical piece of metal to a flat edge is difficult, but you just need a few tack welds to hold it in place.
Step 5:
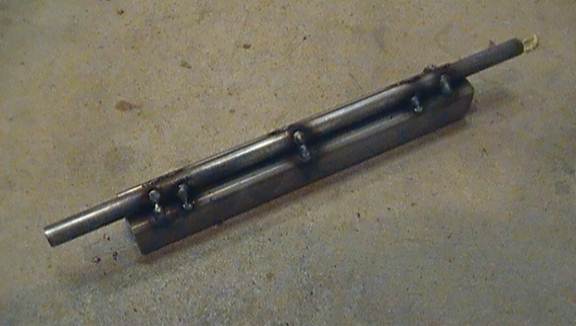
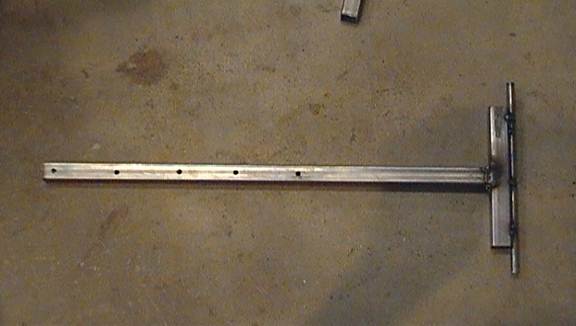
Take your left over, extra long piece of 3/4inch square tubing and cut it to whatever length you want the arm of your flipper rig to be (length in the photo is 18inches). Go ahead and drill some holes in it. These will be the holes you will attach your prop or pieces of wood to.
Weld the arm piece to the rod+tube piece, be as centered as possible and make sure the arm is perpendicular to the length of the rod.
Step 6:
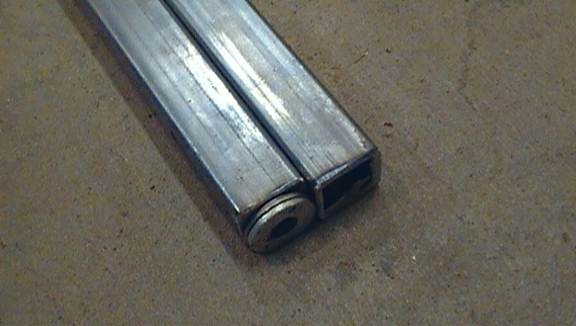
Pay very close attention here: now put a washer on both ends of the rod, and then your two 4inch pieces of tube on both ends of the rod. Now weld the 4inch pieces to the corners of the U-shaped base. Use magnets to keep the pieces perpendicular.
IMPORTANT: While welding, KEEP THE ROD IN PLACE! If you weld the 4inch tubes without the rod already stuck between them, you will be unable to put the rod in afterwards.
Make sure that the rod can rotate freely between the two 4inch tubes.

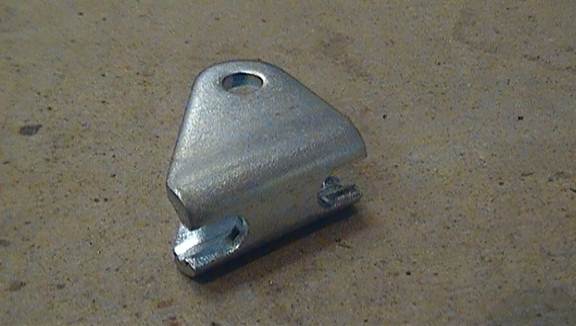
Step 7 (Optional, but advised):
Take the Pivot Bracket (as shown below) and grind down the “sharp) corner until the indentation is gone. This is so you can mount the bottom of your air cylinder as close to the bottom of the rig as possible, giving you a better angle. Without grinding it down, the cylinder bottom will be about a centimeter higher than necessary.

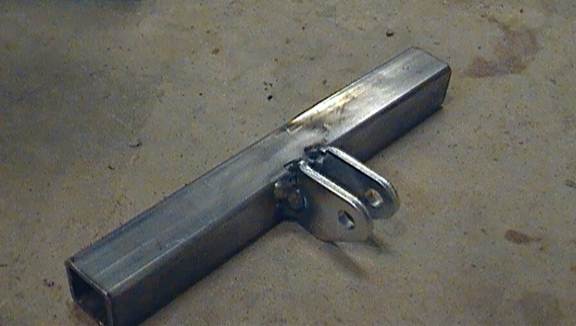
Step 8:
Weld the pivot bracket to your remaining 6inch piece of tube. Again, be as centered and perpendicular as possible. Place the side with the hole up. Use the ground-down side as the bottom. This is where you will mount the bottom of your cylinder and the hole has to be slightly elevated to keep the cylinder from hitting the ground when it rotates.
Step 9:
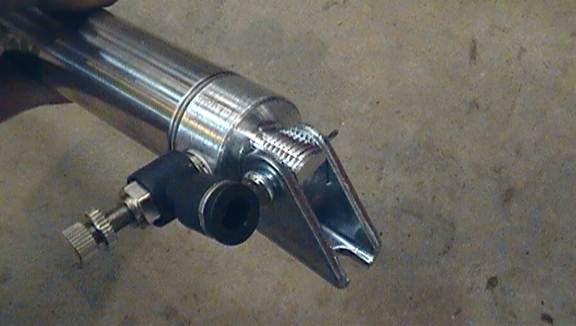
Attach the brackets and valves to your air cylinder.
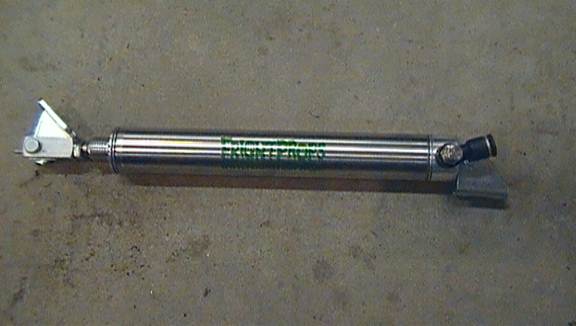
This is the base of your air cylinder. This picture is of the pivot bracket before it was welded on (yours will already be welded on, but it attaches the same way). This also shows a male connector with flow control (optional. The flow control will regulate how fast the cylinder retracts its rod). You can use any regular push-on male connector. Be sure to use pipe thread sealant tape when installing air hose pieces, and use a wrench to tighten.
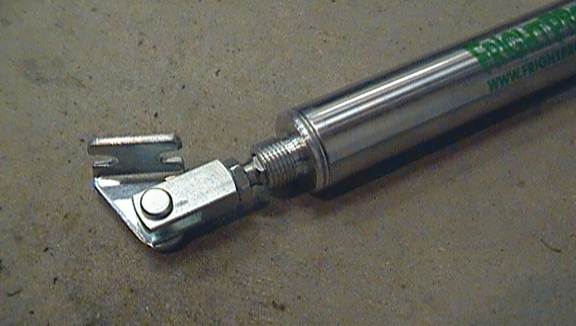
Below is the “nose” of the cylinder with a clevis and clevis and clevis mounting bracket installed. You may need a washer to take up the extra length of the pin holding the bracket to the clevis, to keep it from wobbling.
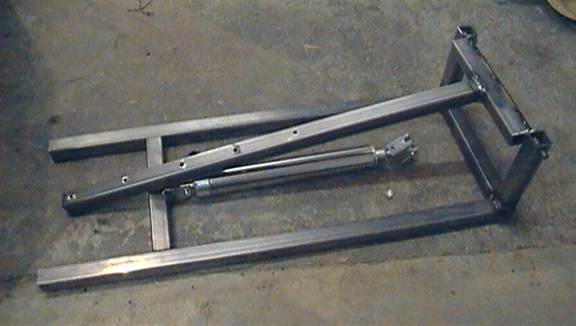
Step 10:
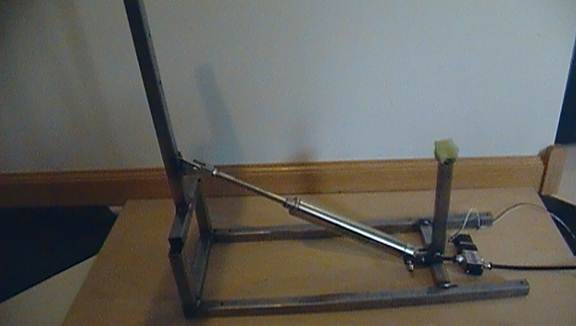
This is the tricky bit. You want to weld the 6inch tube with pivot bracket within the U-shaped base and weld the clevis bracket to the underside of your flipper arm in such a way that when the pneumatic cylinder extends (the cylinder in the picture has a 4 inch stroke) the arm is pushed and rotates to point straight up so that your prop is perpendicular to the ground.
There is a lot of guess and check work here. Use clamps or just your fingers to move the pivot bracket tube and the clevis bracket to different positions and examine how the arm is rotated with the pneumatic rod retracted and extended (if you bought a single acting cylinder, you’ll be able to extend the rod just by pulling on it. A spring retracts it.).
Be careful of mounting the clevis bracket too close to the arm’s pivot point. If you do, the arm will want to swing down instead of up, and the rig will lock up.
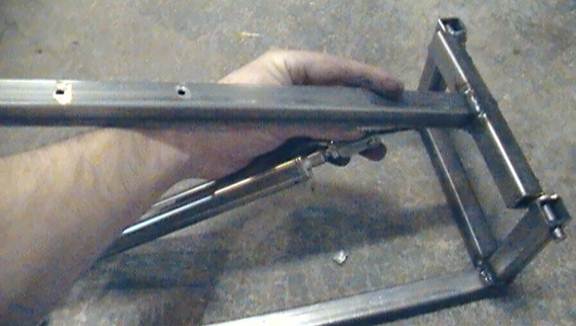
Before committing to any permanent welds, when you think you have the right positions, tack weld them in place. Double and triple check that when the pneumatic is retracted, the arm rests without swinging downwards and that when the pneumatic is extended, the arm points directly upwards (see the second picture of this instructional).
When you’re confident that you have the right spots, weld firmly in place.
Step 11 (optional):
You’ll probably have a little 3/4inch metal tubing left over. You can use this to make a brace for the arm when the pneumatic is retracted. This is to absorb the impact of the pneumatic retracting: taking stress off of the pneumatic itself and making absolutely sure that the arm doesn’t swing down too far and lock up, in case you welded the clevis bracket too close to the arm pivot. Just cut the metal to approximately the vertical distance between the pivot bracket tube and the arm. Weld it in place and add something soft and squishy (such as foam or a rag) to the top of it to absorb the impact and prevent the loud CLANG that comes with two pieces of metal knocking together.

Step12:
The hard part is over! If you’ve already drilled holes in the base of your rig (the U-shaped piece) then use those holes to mount your rig to a wide platform of wood (plywood is ok). You’ll need to mount it to a platform of wood to keep the rig sturdy and keep it from flipping itself over. Any increase in prop weight, cylinder bore size, or PSI supplied to the cylinder will require a larger or heavier base platform to mount the rig to.
(rig installed to base platform of wood is not shown)
Similarly, use the holes in the flipper arm to mount your prop! It is recommended to mount a prop to a two-by-four piece of wood, and then affix the piece of wood to the flipper arm with screws. This way, you won’t have to alter the rig itself to swap between props. If you can attach a prop to a piece of wood, you can use it with this rig.
(not shown)
Step13:
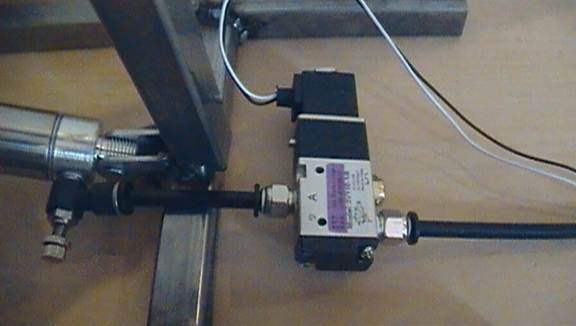
Now it’s time to supply power to your rig. Install the FrightProps hook-up starter kit as instructed in the guide you’ll receive with the kit.
Note: A Flow Control Union should be added in the hose between the solenoid and the cylinder in order to regulate how fast the rig flips, it can be quite fast and dangerous otherwise..
Step14:
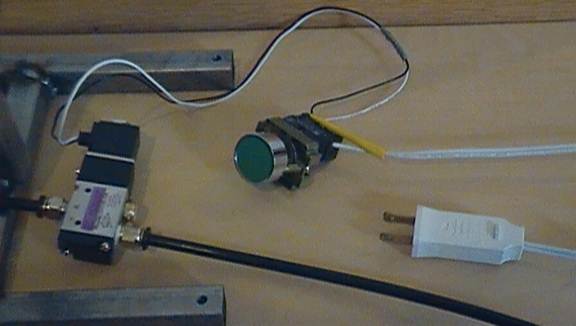
To activate the solenoid, and as a result your pneumatic rig, you need to supply it power. If you bought a 110VAC activated solenoid, you just need to splice a power chord and solder or crimp the wires together. Plugging the cord in will turn the solenoid on and the cylinder will extend. Unplugging it will turn the solenoid off and the cylinder will retract.
Naturally, this isn’t very practical, but it’s good for testing. You can install a button (such as shown bellow), a pressure mat, a motion sensor, or other triggers to activate your pneumatic rig.
Step15:
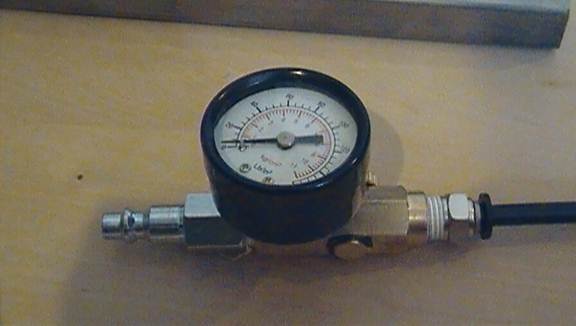
Use the push-on connector at the other end of your airline hose. Hook a regulator to that, and an air-compressor hose adaptor to that. Plug it into your air compressor and you now have power to your pneumatic.
It is HIGHLY RECOMMENDED that you use an air regulator here. FrightProps systems are not designed to operate above 120 psi, and pneumatics can be very dangerous when supplied large amounts of pressure.
(Important note: the regulator/gauge shown bellow is not from FrightProps.com, but they do supply regulators)
With the air hose hooked up and power supplied to the solenoid, you’re good to go! You now have a functioning pneumatic prop flipper!
FINAL NOTES:
Remember that pneumatics can be dangerous if the right precautions are not taken.
-Make absolutely sure that the rig is receiving less than 120PSI at all times.
-When testing the rig for the first time, make sure all persons are at least five feet away and to the side of the rig (not behind or in-front), and that the area is clear around the rig.
-Make sure that the prop and the base platform are securely attached to the rig before activating it.
-Be sure to regulate pressure or enlarge the base platform so that the rig does not move from its spot when activated repeatedly.
-Inform everyone working around or with the rig about the dangers of it, and safe operation.
-When using this rig for an attraction, be sure that it is placed where it has no chance of physically striking someone, even if they wander from the attraction’s designated path. It is safer yet to regulate PSI to the minimal force required to flip your prop.
